Submit Job
A job is a group of samples that are processed through the lifecycle together. A job may consist of samples for any number of products.
Each sample within a job represents a single article for analysis. A sample may consist of one or more units or doses.
Contents
Prerequisites
To create a job you require:
- The
Lifecycle:Submit jobuser permission. - A full static data setup, meaning:
- At least 1 client assigned to your user account.
- At least 1 published (version 1 or greater) product, assigned to the client.
- At least 1 published (version 1 or greater) test method.
- At least 1 test suite, assigned to the latest versions of both the product and test method.
Job Details
To start submitting a job through LabHQ:
- Select the Lifecycle > Submit Job menu from the sidebar or click on the [ Submit Job ] icon in the header bar.
- You will either be shown a pre-existing draft job (if you’d created one previously but hadn’t yet submitted), or be prompted to create a new job. If you need to create a new job, select the [ Create a New Job ] button.
- From the Client field, select the client you wish to submit a job for.
- If you are submitting a job on behalf of one of your clients, you will need to select the client name from a list of clients assigned to your user account.
- If an external customer is submitting a job on behalf of their company, their client should be selected automatically (provided they only have a single client associated to their account).
- In the Batch number field, optionally enter the batch details for the job.
- If you would like to include testing of multiple batches in one job, you can list them in here, or you can use the sample batch numbers (see Adding samples).
- In the Description field, enter an optional description of the job.

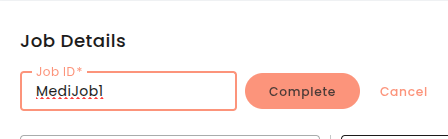
Customizing Job Identifiers
During the job creation process, you have the option to customize the job identifier to better align with your internal tracking systems.
How to Edit the Job Identifier
- Click the pencil icon located next to the job identifier field.

- Enter your custom identifier.
- Click the [ Complete ] button to save your changes.
Validation and Constraints
- Unique: The job identifier must be unique across all jobs within your organization
- Character Limit: The job identifier can be a maximum of 20 characters.
- Timing: Job identifiers can only be edited during the job creation phase. Once the job is created or submitted, the identifier cannot be modified.
ℹ️ Sample identifiers are automatically generated based on the job identifier. Changing the job identifier will inform the identifiers for newly added samples.
Adding Samples
Once you have selected a client, the Sample Details section appears below the Job Details pane.
- Click on the Search products field and select the name of the product you wish to add sample(s) for.
- The product list is filtered based on the client you are submitting a job for.
- Click the [ + ] button next to the product field to add the product.

You can add one or many samples to the product you have added.
- Click the [ Add Samples ] button and enter the number of samples you want to add.
- Select a test suite from the test suite dropdown.
- The test suite list is filtered based on the product you are submitting a sample for. If only one test suite is associated with your product, the dropdown box will automatically select the test suite.
- A sample test suite can be updated at a later time, after the samples have been added.
- Select the [ OK ] button to add the samples.

Samples will appear in the samples grid where the test suite and further fields can be updated.
ℹ️ A job can contain a maximum of 200 samples.
Applying Batch Details
If the job has a batch number, it will be automatically applied to each sample. If the job does not have a batch number, you will need to add one to each sample manually. Additionally, the sample batch number can be edited if it differs from the job’s batch number.
- Click on the Batch number field for the sample you wish to modify, remove the original batch details if applicable, and enter the new sample batch details.
If you wish to apply the original job batch number back to all samples, or you have modified the job batch number and wish to apply the updates to the samples, click on the options menu in the Job Details section and select Apply Batch to Samples. This will update the Batch number for all products/samples to use the latest job batch number.

ℹ️ Each sample can contain a maximum of 200 tests.
Don’t worry if these aren’t the final set of tests as these can be amended later by a user with the Samples:Add/remove tests permission (the maximum test limit still applies). See Editing Tests.
Editing Tests
If you want to make sure you have the correct test suite applied to your sample, you can view the tests included by hovering over the selected test suite dropdown.
To amend one or more of the tests included on the selected test suite (This requires the Samples:Add/remove tests permission):
- Click on the [ Edit Tests ] icon next to the Test suite field.
- The Edit tests window will open showing the selected test methods (assigned as part of the test suite) and available test methods to add.
To add a new test to the sample:
- Locate the new test method from the Available Test Methods box and select the [ > ] button to assign it to the sample.
- You can use the Search field to speed up your search and filter down the test method list.

ℹ️ If you are adding further tests to samples, note that each sample can contain a maximum of 200 tests.
To remove a test from the sample:
- Click on the bin icon next to the test you wish to remove.
- The test will be removed from the test method list and from the sample.
To remove all tests from the sample and re-assign new tests:
- Click on the options menu next to the Selected Test Methods box and select the Remove All option.
- This will automatically remove all selected tests from the sample.
If you wish to add repeat tests for an existing sample test method:
- Click on the Total field next to the test method you wish to repeat and enter the number of repeats you wish to apply.
- This is the total number of repeats you require for the test method. For example, if you would like to repeat a test method 3 times, you would need to set the total repeats to 3.
- The repeats will always default to 1.
Sample Details
⭐ Sample labels are a premium feature. Please click here for more information.
To apply an optional sample label and description:
- Select the pencil icon next to the sample you wish to edit.
- In the Label field, enter an optional label that can be used in addition to the unique Sample ID automatically generated by the system. For example, you may wish to record the client’s sample identifier.
- In the Description field, enter an optional description.

Removing Samples
If you have added too many samples to the job and wish to remove one, you can remove individual samples:
- Click on the options menu to the right of the sample.
- Select Delete.
If you would like to delete all samples for a particular product:
- Click on the options menu next to the Add samples field.
- Select Delete > All.
If you no longer wish to submit samples for one of your selected products, you can also remove this product from the job:
- Click on the options menu next to the product name.
- Select Delete.
- This will automatically remove any samples that were previously added for this product.

Submitting a Job
Once you have finished adding samples and checking their assigned tests, you can then use the [ Submit ] button to progress the job. Or you can simply leave the page and return to it later. All changes will be saved automatically while on this page.
Job Submission Summary
If the Save Job Submission Summary setting is enabled, a job submission summary report will be generated at the point of job submission. It will then be available on the job viewer via the Attachments screen.
If the setting is not enabled, it is possible to generate a job submission summary report from the job viewer screen.

Cancelling a Job
If you no longer wish to continue job submission for the job you have created, click on the [ Cancel Job ] button and click [ OK ] to proceed with discarding the job. This will remove the draft job and return you to the main Submit Job screen where you can either create a new job or return to the dashboard.